Wednesday, October 12, 2016

Some Halloween Fun

Welcome to Punchin' Up!

Spooky Halloween

Today I'm going to be sharing with you a Step Card that I made for our Inking Everything Facebook Hop.  I love to do Punch Art, 3D type cards and  Step Cards.  This Halloween Card combines all those things which makes it so fun to create. It's hard to see, so you have to imagine that you can, LOL, but there is a tealight behind the window which shines through and flickers.

ENJOY!!!


Products Used:
 
Stamp Set: Spooky Fun
Cardstock: Smoky Slate, Basic Black, Pumpkin Pie, Daffodil Delight, Vellum
Ink: Basic Black, Tangerine Tango, Whisper White, Elegant Eggplant, Smoky Slate
Edgelits/Thinlits Dies: Halloween Scenes, Home Sweet Home
Accessories: Basic Rhinestone Jewels, Tea Light


Please visit my online store to purchase any of the products used to create this card or to create any project of your own.
  http://punchinup.stampinup.net

Thank you for stopping by and allowing me to share with you what I love, "Creating".  

Have a great day,
Cathy

Monday, September 19, 2016

Cookie Cutter halloween

 Welcome to Punchin' Up!


Halloween Fun

Today I want to show you a dresser card we made  this month at my Holiday Card Class using some of the FUN new products from the Holiday Catalog.
The basic design of this card was created by Connie Babbert, with a few changes and tweaks from me.
I love how it turned out by adding the little ghost, the spider on the drawers, the "Trick Or Treat" sign and I used a different spider web.  
Such a fun card to make and give out.
It was a big hit with all my ladies at class.


Products Used:

Stamp Set:  Cookie Cutter Halloween, Spooky Fun
Cardstock:  Basic Black, Whisper White, Smoky Slate
Ink:  Whisper White Craft, Smoky Slate, Tangerine Tango
Accessories:  Basic Jewel Rhinestones, Stampin' Write Markers, Cookie Cutter Builder Punch

Please go to my online store to purchase any of the products used to create this card or any products on your wish list to create your own masterpiece.


Thank you for stopping by,
Cathy

Thursday, September 8, 2016

Bunch Of Blossoms

Welcome to Punchin' Up!

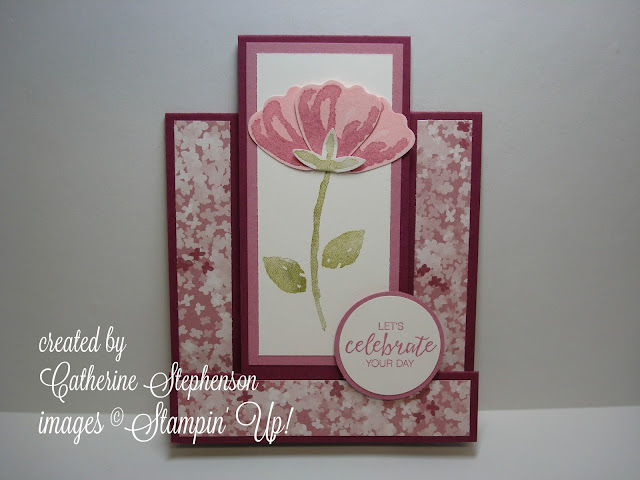
Let's Celebrate 

Today I'm sharing a Fun Fold Card that we made at my Monthly Card Workshops using the Stamp Set "Bunch Of Blossoms."  
Who doesn't like to receive a beautiful card on a special day.   I think this one is just perfect.

Not only does this stamp set have the beautiful flowers, but it has many sayings to complete the card.


Products used:

Stamp Set:  Bunch Of Blossoms 
Cardstock:  Whisper White, Rich Razzleberry, Sweet Sugarplum, Pink Pirouette
Ink:  Sweet Sugarplum, Old Olive Pink Pirouette
Punch:  Blossom Builder Punch, 1 3/8" Circle,
 1 1/2" Circle
Accessories:  Blooms and Bliss Designers Series paper

Please visit my online store to purchase any of these products used to create this card or to purchase any products on your wish list to create your masterpiece.

 Make sure you take a look at these September Specials.  There are some great deals you won't want to let slip away.
 

Thank you for letting me share with you my creations and my love of stamping.

Cathy

Friday, September 2, 2016

Flourish Thinlits/Flourishing Phrases

Welcome to Punchin' Up!

Flourishing Phrases Part Two 

Today the card I will be showing you is a card using the "negative" cutout from the Sympathy card that I posted a few days ago.  I just knew it was just to pretty to toss out so.... here is the card I came up with.  I will show you both of them so you can compare and see what you think. Such a fun way to get two card front ideas from just one piece of cut cardstock.

The original card


 And here is the card I'm showing you today using the "negative" cutout just flipped over.


Isn't this so pretty with the glimmer paper behind the cutout..... What do you think?

Products used:

Stamp Set:  Rose Wonder
Cardstock:  Marina Mist, Dapper Denim, Whisper White
Ink:  Dapper Denim 
Thinlits/Framelits:  Flourishing Thinlits, Layering Oval Framelits
Accessories:  Dazzling Diamond Glimmer Paper,
3/8" Dapper Denim Ruched Ribbon

Please visit my online store to purchase any of these products used to create this card or to purchase any products on your wish list to create your own masterpiece.

Thank you for stopping by,
Cathy

Friday, August 26, 2016

Flourishing Phrases

Welcome to Punchin' Up!

With Sympathy

Today I will be showing you a card I designed for my Monthly Card Classes featuring the "Flourishing Phrases" Stamp Set.  Sympathy Cards are not one of my favorite to make, but we all need them at sometime in our lives.  I love how it turned out, very simple, but with meaning.


Products Used:

Stamp Set:  Flourishing Phrases 
Cardstock:  Whisper White, Wisteria Wonder, Elegant Eggplant
Ink:  Wisteria Wonder 
Thinlits/Framelits:  Flourish,  Layering Ovals
Accessories:  5/8" Organza Ribbon, Elegant Dots Textured Impressions Embossing Folder 

Please visit my online store to purchase any of these products used to create this card or to purchase any products on your wish list to create a masterpiece of your own.
             http://punchinup.stampinup.net

Have a great day,
Cathy

Friday, August 19, 2016

Botanical Blooms

Welcome to Punchin' Up!

Botanical Blooms Treats

Today I'm sharing one of the projects that we made at my club this month.  I had received one from a good friend and fellow Demonstrator Sabina, at On Stage in April.  I thought it was such a great idea that I knew we had to make them.  I did change it a bit with new In Colors and new Designers Series Paper, but love how it looks.


Products used:

Stamp Set:  Grateful Bunch
Ink:  Rich Razzleberry  
Cardstock:  Sweet Sugarplum, Whisper White, Rich Razzleberry, Wild Wasabi
Framelits:  Botanical Builder, Layering Ovals 
Designer Series Paper:  Blooms And Bliss
Accessories:  Blossom Builder Punch, Basic Rhinestone Jewels

Please visit my online store to purchase any of the products used to create this project or to purchase any products to create your masterpiece.  http://punchinup.stampinup.net

Thank you for visiting today,

Have an awesome day!!!
Cathy


Wednesday, August 10, 2016

Swirly Scribbles Wreath

Welcome to Punchin' Up!

Tis' the Season 

The card that I'm going to show you today is a card I did with my Stampin' Up! Club Class using the Swirly Scribbles Thinlits and the Hearth and Home Thinlits.
I've seen so many cards made using these two thinlits that I had to give it a try too.  I like the way it turned out.


Products used:

Stamp Set:  Peaceful Pines
Cardstock:  Emerald Envy, Whisper White, Vellum
Ink:  Real Red
Accessories:  Hearth and Home Thinlits, Swirly Scribbles Thinlits, Softly Falling Embossing Folder, Brick Wall Embossing Folder, Rhinestone Basic Jewels, Real Red 3/8" Stitched Satin Ribbon

Please visit my online store to purchase any of the products used to create this card or any products you wish to create a masterpiece of you own. 

Thank you for stopping by,
Have a great day,
Cathy 

Monday, August 8, 2016

Punch Art Reindeer

Welcome to Punchin' Up!

OH,  What Fun

Today I'm sharing with you the last card of the set of 4 Christmas cards that we made at my "Christmas in July" Card class.  But I must say...this one is my favorite. 
Why....You might ask?  
Well if you have been following my blog you know that I LOVE to create with punches, framelits and thinlits. I was so excited how this turned out.


The saying I thought fit him perfectly. 
What do you think?

Products used:

Stamp set:  Oh, What Fun
Cardstock:  Very Vanilla,  Garden Green, Real Read, Early espresso, Cherry Cobbler, Kraft
Ink:  Cherry Cobbler, Soft Suede
Punches:  Tree Builder, Festive Flower, 
3/4" Circle, Balloon Builder
Accessories:  Cucumber Crush Thick Bakers Twine, Pearl Basic Jewels, This Christmas Speciality Designers Series Paper, Holly Embossing Folder, Signo Gel Pen

Please visit my online store to purchase any of these products used to create this cute Punch Art Reindeer or to create a masterpiece of your own.

Thank you for visiting my blog 

Please visit my facebook page

Punchin' up by Cathy


Have a great day,
Cathy

Friday, August 5, 2016

Peace This Christmas

Welcome to Punchin' Up!


Christmas In July Card Class

This is the third card from my "Christmas In July"
card class.  This card is using the same Stamp Set "Peace This Christmas" and Designers Series Paper "This Christmas" as the card I posted earlier this week. I love the fact that this Designer Series Paper is so pretty on both sides.  I usually seem to like one side better than the other, but not in this case.  Both sides are awesome which makes it hard to make decisions. LOL  

 Products Used:

Stamp Set:  Peace This Christmas
Cardstock:  Cherry Cobbler, Very Vanilla
Ink:  Garden Green
Designers Series Paper:  This Christmas
Embossing Folder:  Holly
Accessories:  1/8" Gold Ribbon, Rhinestone Basic Jewels (colored red), Banner Triple Punch

Please visit my online store to purchase any of the products used to make this card or to purchase any products on your "Wish List" to create your own Masterpiece. 

Thank you for visiting today and make sure you check back on Monday as I will be posting another card from my "Christmas In July" card class featuring a very cute punch art reindeer I created.  You won't want to miss it.

Happy Stamping,
Cathy

Wednesday, August 3, 2016

Christmas Card

Welcome to Punchin' Up!


Peace This Christmas

The card that I'm showing you today is another card that we made at my "Christmas in July" card classes using the stamp set "Peace This Christmas" along with the coordinating Designers Series Paper " This Christmas".
I love how it turned out, simple but yet so pretty.


Products Used:

Stamp Set:  Peace This Christmas
Cardstock:  Very Vanilla, Cherry Cobbler, Garden Green
Ink:  Garden Green, Early Espresso, Real Red
Designer Series Paper:  This Christmas
Accessories:  1/8" Gold Ribbon

Please go to my online store to purchase any of these products to make this card or to purchase any products on your wish list to create a masterpiece of your own.

Thank you for visiting,

Have a great day,
Cathy

Wednesday, July 20, 2016

Peaceful Pines

Welcome to Punchin' Up!

Christmas in July 

Today I'm sharing with you one of the four cards that we are making this week in my "Christmas in July" card class.  It is a very simple card, but I think so pretty with a touch of Silver Glimmer paper.
What do you think?


Products Used:

Stamp Set:  Peaceful Pines
Cardstock:  Whisper White, Night of Navy
Ink:  Night of Navy
Punch:  Decorative Label
Accessories:  Silver Glimmer Paper, Softly Falling Embossing Folder, Perfect Pines Framelits

Please visit my online store to purchase any of the products used to create this card or any products on your "Wish List" to create your own masterpiece.

Thank you for visiting
Have an awesome day 
Cathy
  

Wednesday, July 13, 2016

Washi Tape Holder

Welcome to Punchin' Up!

 
Today I'm going to share with you this awesome Washi Tape Holder.  It is just so fun to make and what a great way to store your Washi tape.  I saw the dimensions on another Demonstrator's Blog, Sam Hammond Donald, from the UK, so all credit goes to her for this creative idea.  I just put my own twist on it and changed it up a bit by stamping it with flowers.  But then I thought..... how cute would it be to decorate it by adding a flower. So this is what I came up with... I think it turned out great.

 Here are the measurements and photos so you can create your own Washi Tape Holder.

5 Spool Washi Tape Holder
Cardstock size 11" x 6 5/8"
Scored on the long side at 1", 3", 5 1/2" 8", 10"
Scored on the short side at 2", 4 5/8"

3 Spool Washi Tape Holder
Cardstock size 11" x 5 5/8"
Scored on the long side 1", 3", 5 1/2", 8", 10"
Scored on the short side 2", 3 5/8"

Score, fold and then cut on the score line as shown in the picture below

 Fold and glue the first sides as shown below


Fold and glue the next sides and cut off at an angle as shown below
 

Mountain Fold in the middle, glue and then add Washi Tape around the bottom of the container as shown below
 
 I made a flower using the Pansy Punch and glued it to the side as shown...So cute...don't you think?
Products used for this project:

Cardstock:  Peekaboo Peach
Ink:  Peekaboo Peach
Stamp Set:  Penned & Painted
Washi Tape:  Playful Palette 

Please visit my online store to purchase any of the products used to make this awesome Washi Tape Holder or to purchase any products on your wish list to create your own project.

Thank you for stopping by and have a great day,

Cathy
 

Friday, July 8, 2016

Stampin Up Bonus Day

Welcome to Punchin' Up!

Bonus Days

TH_Social1_BonusDays_demo_July0716_US
I’m so excited about Bonus Days! This is the first time Stampin’ Up! has offered coupons to customers! All you need to do for your $5 USD coupon is spend $50 USD in July. Stampin’ Up! will email you a coupon for every $50 USD you spend, and you can use coupons on anything you  want in August!"                   
                      
DETAILS
• Promotion Period: July 7–31, 2      016
• Redemption Period: August 2–31, 2016
An email address is required to participate in this promotion;
Bonus Days coupon codes can only be delivered via email.
It is strongly recommended that participants both save emails
containing their Bonus Days coupon codes AND write down
the coupon codes in a safe place. Codes cannot be resent if the
email is lost, and lost codes cannot be recovered.
Bonus Days coupon codes can be redeemed for any product,
excluding Starter Kits and Paper Pumpkin subscriptions.
 New
prepaid Paper Pumpkin codes can be redeemed
                              
An
Don't miss out on this fantastic deal
Please visit my online store to purchase all the fun products you have been wanting.
 
Thank you,
Have a wonderful day,
Cathy


Wednesday, July 6, 2016

Sitting Here

Welcome to Punchin' Up!


Today I'm going to be showing you a card using the stamp set "Sitting Here".  This card looks so inviting to just sit on that bench swing with the fluffy pillows and relax with a good book. I could probably sit there a few hours... how about you?


Products Used: 

Stamp Set:  Sitting Here, Sheltering Tree
Cardstock:  Whisper White, Early Espresso, flirty Flamingo
Ink:   Early Espresso, Flirty Flamingo, Garden Green
Accessories:  Stampin' Write Markers Crumb Cake and Flirty Flamingo, 3/4" Circle Punch

Please go to my online store to purchase any of these products to make this card or any card/project of your choice.

Thank you for stopping by for a visit,
Have a wonderful, relaxing day ,
 
Cathy


Monday, July 4, 2016

Punch Art --4 of July

Welcome to Punching Up!

Celebrating the 4th of July

I would like to share with you a Punch Art picture  I did for the month of July using a variety of Stampin' Up! Punches and Framelits.  (some are retired, but I keep all punches and framelits as I love creating with them)


 This was a class I did for my customers. We had a  Punch Art Picture Class every month for a year where we created a different Punch Art Picture for each month. This class was a big hit.  It is so fun to decorate with a different picture in the frame for each month.  I hope you enjoy it..... 

 Please visit my online store to purchase any of your Stampin' Up! products to create your masterpiece.

 Don't forget to go to my main page of my 
Blog and "Subscribe by Email" so you don't miss any of my projects that I post.

HAPPY 4th OF JULY TO YOU ALL!!!

Thanks for stopping by,
Cathy

Friday, July 1, 2016

New Month-- New Calendar

Welcome to Punchin' Up!

July is Here

I can't believe that it is July already, where did June go.  I'm just not ready for the hot weather that July brings, but I must say the hot weather has already hit us here in Idaho.  The last couple of days have been in the 100's, and it's suppose to be in the high 90's the rest of the week and into next.  Oh well, I should be use to it as I have grown up in Idaho my whole life.  

I'm sharing with you today the July page from the 2016 CD Desk Calendar Class that I do ever year in October and November.  We do 6 months in October and 6 months in November.


Products Used: 

Stamp Set:  Celebrate Today
Cardstock:  Real Red, Night of Navy, Whisper White
Ink:  Night of Navy, Smoky Slate
Accessories:  Real Red Ribbon, Glimmer Paper Red, Glimmer Paper Dazzling Diamonds, Medium Star Punch, Small Star Punch (retired)

Please visit my online store to purchase any of these products to make this Calendar Page or to make a creation of your own. 


Thank you for stopping by and have a wonderful day,

Cathy

Wednesday, June 29, 2016

Country Livin'

Welcome To Punchin' Up!

 Country Livin' Masculine Card

Today the card I'm sharing with you is a card we did in one of my Monthly Card Class Workshops using new products from the 2016-2017 Annual Catalog that just came out earlier this month.  It seems like my card class customers are always asking for Masculine Cards, so I created this card using the New stamp set Country Livin' and some of the New Designers Series Paper from the Moroccan Collection.  I love how it turned out, it reminds me of an old truck my dad had when I was growing up.


Products Used:

Stamp Set:  Country Livin', Thoughtful Banners, Gorgeous Grunge
Card Stock:  Early Espresso, Very Vanilla, Tip Top Taupe
Ink:  Early Espresso, Tip Top Taupe
Designers Series Paper:  Moroccan DSP 
Punch:  Duet Banner

Please visit my online store to purchase any of these products to create this card or any products you wish to create your masterpiece. 

 Thanks for visiting and letting me share with you,

Cathy


Wednesday, June 22, 2016

Floral Phrases

Welcome to Punchin' Up!

Floral Phrases...So Beautiful

Today I going to share with you a card that we are making this week at my stamp classes using the New Stamp Set "Floral Phrases".  It is such a beautiful Stamp Set and it also has matching Designers Series Paper plus a Detailed Floral Thinlits Dies to go with it all.  


Products used:
Stamp Set:  Floral Phrases
Ink:  Night of Navy
Cardstock:  Night of Navy, Whisper White
Designers Series Paper:  Floral Boutique
Framelits:  Project Life Cards and Labels
Accessories:  Night of Navy Solid Baker's Twine, Floral Boutique Designers Washi Tape

Please visit my online store to purchase any of these products used to make this card or any products you would like to create your own masterpiece project.

Don't forget to go to my Punchin' Up! blog home page and "Subscribe by Email"  so you don't miss any projects I post.

Thanks for visiting,
Have a great day
 Cathy
 

Friday, June 17, 2016

Sweet Cupcake

Welcome to Punchin' Up!

Cupcake Fun with Frosting

Here is a card I created using the New Stamp Set "Sweet Cupcake" and the New Framelits "Cupcake Cutouts."  Check out the cupcake, doesn't it look like it has real frosting on it. 


 I was playing around with the recipe that they had shared at On Stage in April.  They demonstrated it by dipping the stamp in the frosting mixture and then stamping it on the already stamped image. This is a 3 step stamp to make it look realistic.  Well, I thought what would happen if I  just spread the mixture on the die cut image and letting it dry.  This is what I came up with.  I like the way it turned out.


I would advise that you make sure you don't leave the mixture on the counter top as someone might just try to eat it.  My husband and grandkids thought it looked like real frosting.  

Frosting Recipe:

1/4 cup corn starch
1 Tablespoon of white glue
1  Tablespoon of Acrylic Paint 
Drops of reinker, which ever color you want the frosting (I used Melon Mambo)
Drops of water to make it the consistence you want it.

Products used:
Stamp Set:  Sweet Cupcake
Ink:  Melon Mambo, Crumb Cake, Chocolate Chip, 
Cardstock:  Melon Mambo, Crumb Cake, Pink Pirouette, Whisper White
Framelits:  Cupcake Cutouts (this also comes in a bundle deal with the stamp set for a great saving)
Accessories:  Sparkle Textured Embossing Folder

Please visit my online store to purchase any of the products used to create this card or to create any  project you wish. 
http://punchinup.stampinup.net

Thanks for visiting

Have a great day,
Cathy


Wednesday, June 15, 2016

Layering Love Card, Granddaughter's Creation

Welcome To Punchin' Up!

 My Granddaughter's Creation

First of all today, I want to share with you the beautiful Planter Box Card that my 5 year old granddaughter, Annalyn, made.  She saw the Planter Box Card I had made last week and shared here on my Blog.  She wanted to make one too.  I always save all my extra flowers that I punch out when making a card (I just can't throw them away), well.... that stash was just perfect.  She had quite the collection of flowers and such, that I gave her.  


As you can see, it is quite the garden of flowers.  She creates her own flowers by gluing many together to make one.  I just love it...
"Proud Nana Moment"


This next card I made for a New Catalog Swap I participated in using the New Stamp Set "Layering Love" and the New In-Color cardstock "Sweet Sugarplum" along with a touch of Basic
Gray and Rich Razzleberry.  A great card that would work for a variety of occasions.


Stamping on Sweet Sugarplum and sponging with Rich Razzleberry around the petite petals flowers just adds a great Pop, don't you think?

 
Products Used:

Stamp Sets:  Layering Love, Petite Petals
Cardstock:  Whisper White, Sweet Sugarplum, Rich Razzleberry, Basic Gray
Ink:  Rich Razzleberry
Accessories: Lots of Labels Framelits, Petal Burst Embossing Folder, Basic Pearls

Please go to my Online store to purchase any of these products to create this card or any other project. 
                             http://punchinup.stampinup.net

Don't forget to "Subscribe by Email" on the main page of my blog to receive all my posts.

Thanks for letting me share with you.
 
Have an Awesome Day,
Cathy


Monday, June 13, 2016

Painter's Palette

Welcome to Punchin' Up!


Playful Palette Fun Fold

Today I am showing you a card that I made for a Demonstrator swap using the New Stamp Set "Painter's Palette" and the New Designers Series Paper "Playful Palette". To be honest, I wasn't to crazy about this new Designer's Series Paper, but after working with it on a few projects it is "growing on me".  I thought this fun fold card design was perfect to showcase the new stamp set and the New "Layering Squares Framelits", which are AWESOME!!!!  It makes it soooo easy to cut out and layer your cardstock, especially with both regular squares and scalloped squares included together for just one price. Choose a size you want and your ready to go.


Here is the side view...


Products Used:

Stamp Set:  Painter's Palette
Ink:  Sweet Sugarplum
Cardstock:  Sweet Sugarplum, Rich Razzleberry, Very Vanilla
Designers Series Paper:  Playful Palette
Framelits:  Layering Squares 
Accessories:  Sweet Sugarplum 3/8" Ruched Ribbon  

Please go to my online store to purchase any of these products to make a this card or any project you want to create. 

Don't forget to go to my Blog's home page and "Subscribe by Email" so you don't miss any of the projects I post.  Thanks for visiting today.

Have a great week,
Cathy


Friday, June 10, 2016

Marquee Messages

Welcome to Punchin' Up!


Happy Father's Day 
or 
Birthday

This was a card that we made at my Stampin' Up! Club Workshop using the Marquee Messages Stamp Set that I had received when I went to On Stage in April.  My club members had the choice to make the greeting inside "Happy Father's Day" or "Happy Birthday".  I think using the New In-Colors with this stamp set could work for many special occasions, don't you think so.....


Products used: 
Stamp Set:  Marquee Messages
Cardstock:  Dapper Denim, Emerald Envy, Peekaboo Peach, Basic Black, Very Vanilla
Ink:  Basic Black
Accessories: Stampin' Write 2016-2018 Markers, Wink Of Stella

Please visit my online store to purchase any of these products used to make this card. 

Don't forget to "Subscribe by Email" on the main page of my blog.

Thank you for visiting,
Cathy


Wednesday, June 8, 2016

Botanical Planter Box

Welcome to Punchin' Up!

Wooden Flower Box

Today I'm posting a project that I did for my "Open House" using some of the New 2016-2018 In-Colors.  My customers love it so much that they wanted to make one, so we did it at my Stampin' Up! Club.  They all went home with an awesome Planter Box filled with beautiful flowers. 


Best of all....
 it folds up (as seen below) and you can send it in a regular A-2 envelope 


I have seen many of these type of Planter boxes, but they were always a lot bigger than what I wanted so I made a smaller version.  I have posted the measurements below so you can make one too.
Enjoy!!!

Cardstock Measurements:
 2 - 5"x 2"   sides of the planter box - scored at 2 1/2"
4 - 3 1/3"x 1"  corner posts - scored at 1/2" down the long side
The planter box sides are glue in the middle of each corner post leaving 1/2" at the top and bottom of each post.
4 - 3 1/2"x 1 3/4"  inserts to attach the flowers - scored at 1/2" on each end of the long side  (as seen in the picture below) The inserts are even with the bottom sides of the planter box which leaves 1/4" below the sides at the top.  This way you don't see the inserts once you attach the flowers to the top.


Products used:

 Cardstock: Soft Suede, Peekaboo Peach, Flirty Flamingo, Sweet Sugarplum, Daffodil Delight, Wild Wasabi, Garden Green
Ink: Peekaboo Peach, Flirty Flamingo, Rich Razzleberry, Crushed Curry, Soft Suede
Stamp Sets: Grateful Bunch, Petite Petals, Flower Shop, Hardwood
Framelits: Botanical Builder 
Punches: Pansy, Petite Petals, Bitty Butterfly, Blossom Bunch
Accessories: Sweet Sugarplum Ribbon, Basic Rhinestone Jewels, Dazzling Diamond Glimmer Paper

Please visit my online store to purchase any of these products to create a Planter Box for yourself or someone special. 
http://punchinup.stampinup.net

 Don't forget to go to my main page of my blog and "Subscribe by Email" to receive my posts.


Have a great day,
Cathy


Monday, June 6, 2016

Best Birthday Present Ever

Welcome to Punchin' Up!


Best Birthday Present

This weekend my kids and grand kids had a Birthday BBQ for my husband and I since our birthdays are just a couple weeks apart.  It was fantastic with great company and wonderful eats, but the best part of all was one of the birthday presents my husband and I received from our two grand kids. If you are a grandparent you completely understand why it is so special.  They gave us this pillow.....

but wait it gets even better.....on the back


As you can see my grand kids are still just little, Annalyn is 5, just finished kindergarten, and Stephen is 8, just finished second grade.  And Yes... the highlight for my grandson in second grade was  learning to write in cursive.  
I think they both do a fantastic job with there writing, but I'm sure I'm partial. 

I just had to share our special gift with all of you.


I will be posting projects from my Stampin' Up! open house in the coming days.  There are such fun new In-Colors and new products in the 2016-2017 annual catalog.  I hope you all have a New Catalog if not please send me a message so we can see about getting you one.  Remember you can go to my online store to purchase any of the fun products that Stampin' Up! offers.

Also check out my facebook page and like it

Punchin' Up by Cathy

Have a great day,
Cathy